Digital Miner Guide
Digital miner guide for "The 1.12.2 Pack" and "AllTheMods9"
- Digital Miner About and Usage
- Digital Miner Modes
- Main and Config Interface
- Filters
- "AllTheMods9 Digital Miner Not Working (Ores/Etc.)"
Digital Miner About and Usage
About
This machine teleports mined blocks to its inventory. The player can set the mining radius and the depth for its scanning area. The player can also opt to replace all mined blocks should the player wish to do so by keeping it fed with the desired material. The Digital Miner can be configured to mine ores only within a certain area. The Digital Miner can also be set to silk touch ores, but this results in higher power consumption. the Digital Miner can automatically remove ores from its inventory for automated processing by other machines. It also takes the same upgrades as other Mekanism machines.
Crafting Recipe

|
Ingredients |
|---|
|
Atomic Alloy Steel Casing Logistical Sorter Teleportation Core Robit Basic Control Circuit |
Usage
Digital Miner needs a source of power. It can be powered through its energy slot by one of its three energy ports which are situated on the sides and bottom. In the main interface, click on the gray Config button to specify the area and filters for use. If you do not wish to leave empty spaces where ore blocks used to be, fill the block replacement slot with any block, turn on the requirement in the filters, and supply the necessary blocks in the machine's inventory. Once powered and your filters made, hit the Start button back in the main interface to start mining. The Digital Miner has two IO-Slots (indicated by a yellowish-tan square), the one on the back, where the items can be picked up, i.e. by Logistical Transporter (mod equivalent of an item pipe) and the one on the top front to insert replacement blocks, i.e. from a bin (mod equivalent of a container). To speed up the miner, use speed upgrades. To increase the energy capacity and efficiency of the miner, install energy upgrades. Up to 8 can be used for a 10x effect for both upgrades. It is not recommended to use the digital miner to break items of high importance (machinery/altars) without first testing what effects it can cause (worst case being the item breaks without it dropping and not appearing in the Digital Miners inventory). If you are unsure of anything, try testing the desired item/block first (ores should always be safe to mine). Even though it can bypass obstacles (e.g. warded zones from Thaumcraft, shielded areas from RFTools etc.) by directly accessing the block, it cannot break unharvestable blocks or redstone.
Digital Miner Modes
Inverse Mode
The "I" icon toggle Inverse mode. Inverse mode mines everything that is not in the in the list. A practial use for this is to put Dirt, Grass, Sand, Sandstone, Gravel, Cobblestone and Stone into the ItemStack list and toggle the Inverse mode. The Digital Miner will mine everything but these common materials.
Silk Touch Mode
The Silk Touch button toggles the Silk Touch mode. When mining coal, the miner will instead receive Coal Ore blocks, rather than pieces of Coal. However, this mode requires 6x the amount of energy it needs.
Auto-Eject
The Auto-Eject button toggles the eject function. When a block is mined, the block will automatically be sent to a connected pipe, leading to a chest or to an ore processing machine. If the other end of the pipe is not attached to anything, the miner won't eject them.
Auto-Pull
Block Replacement
Not really a mode, but a feature of the filters. When a block is mined, you can choose to leave another block in its it by specifying a block in the filter. Using Auto-Pull mode with this feature is highly recommended so as to keep the digital miner inventory clear and not having to frequently worry about keeping a constant flow/supply of replacement blocks.
Main and Config Interface
Main Interface

| # | Label | Description |
|---|---|---|
| 1 | Start Button | Initiates mining. Upon running for the first time after being placed or reset, it will scan the area for the desired blocks. It will NOT scan the area for any blocks/items placed after the start button was pressed. The miner will need to be reset for it to re-scan the area for new blocks. |
| 2 | Stop Button | Stops mining. |
| 3 | Config Button | Brings up the config interface (see GUI below). This button will be unavailable to click once the start button has been pressed, the reset button must be pressed to allow access to the config interface. |
| 4 | Energy Slot | Insert a source of energy (like a charged Energy Tablet or Energy Cube) to power the digital miner. This does not need to be used if power is provided externally through one of its energy ports. |
| 5 | Block Status | Indicates if blocks are needed to replace mined ones. If the indication is on, you will need to supply the shown block or else the miner will not continue to mine. |
| 6 | Reset Button | Resets the digital miner; allows for the config to be accessed again and re-scans the area for new blocks after hitting the start button. |
| 7 | Auto-Eject Button | Toggles auto-eject mode; automatically ejects blocks/items not used for replacing mined ones. If there is nothing connected to the output port, the miner will not eject anything. |
| 8 | Silk Touch Button | Toggles Silk Touch mode, where mined blocks act as if mined by a pickaxe enchanted with silk touch. This mode comes at the expense of utilizing six times as much energy. |
| 9 | Auto-Pull Button | Toggles auto-pull mode; automatically pulls blocks from a container (like a bin) for replacing mined blocks. Do not insert items in the top port (like a pipe or an export bus), just place the container (with the corresponding blocks) directly on top of the port. |
| 10 | Upgrade Tab | Opens up the upgrade interface. The digital miner is able to accept speed and energy upgrades, eight each for a maximum multiplier effect of 10. |
| 11 | Security Tab | Changes who is allowed to use/access the digital miner. Set it to private to restrict other players, public for free access, or trusted for friends. |
| 12 | Redstone Control | Changes the behavior of the digital miner with redstone. Default setting is disabled, allowing for manual control. The digital miner can accept the signal on any of its sides. |
| 13 | Energy Information | Indicates how much energy will be utilized during operation, how much is needed if lacking an insufficient supply of energy and the current unit of energy. Click this tab to change the energy unit used (RF/EU/MJ/J). |
| 14 | Visual Toggle | Click this to see the area that the digital miner will cover when mining. The visuals/field will appear as white cubes so as long as the area is not occupied by any blocks. The white cubes represent the maximum area the digital miner will cover, including blocks at those cubes. |
| 15 | Display Screen | Displays the current status of the digital miner. 'Idle' when not running, 'Running' when operating, 'Not Ready' when machine has not run after being reset, 'Ready' after running at least once, what modes are currently active (On/Off) and how many blocks are left to be mined. |
| 16 | Energy Buffer | Hover the cursor over the bar to see how much energy is currently stored by the digital miner. As it depletes, the green bar will decrease. |
| 17 | Inventory | Mined blocks/items will be stored here. Replacement blocks for the mined blocks can also be placed here instead of using a container with blocks and auto-pull mode active. Once this inventory is full, the digital miner will continue to run but not mine any blocks, so please ensure that this inventory is kept cleared by collecting the items or by using the auto-eject function. |
Config Interface

| # | Label | Description |
|---|---|---|
| 1 | Start Button | Initiates mining. Upon running for the first time after being placed or reset, it will scan the area for the desired blocks. It will NOT scan the area for any blocks/items placed after the start button was pressed. The miner will need to be reset for it to re-scan the area for new blocks. |
| 2 | Stop Button | Stops mining. |
| 3 | Config Button | Brings up the config interface (see GUI below). This button will be unavailable to click once the start button has been pressed, the reset button must be pressed to allow access to the config interface. |
| 4 | Energy Slot | Insert a source of energy (like a charged Energy Tablet or Energy Cube) to power the digital miner. This does not need to be used if power is provided externally through one of its energy ports. |
| 5 | Block Status | Indicates if blocks are needed to replace mined ones. If the indication is on, you will need to supply the shown block or else the miner will not continue to mine. |
| 6 | Reset Button | Resets the digital miner; allows for the config to be accessed again and re-scans the area for new blocks after hitting the start button. |
| 7 | Auto-Eject Button | Toggles auto-eject mode; automatically ejects blocks/items not used for replacing mined ones. If there is nothing connected to the output port, the miner will not eject anything. |
| 8 | Silk Touch Button | Toggles Silk Touch mode, where mined blocks act as if mined by a pickaxe enchanted with silk touch. This mode comes at the expense of utilizing six times as much energy. |
| 9 | Auto-Pull Button | Toggles auto-pull mode; automatically pulls blocks from a container (like a bin) for replacing mined blocks. Do not insert items in the top port (like a pipe or an export bus), just place the container (with the corresponding blocks) directly on top of the port. |
| 10 | Upgrade Tab | Opens up the upgrade interface. The digital miner is able to accept speed and energy upgrades, eight each for a maximum multiplier effect of 10. |
| 11 | Security Tab | Changes who is allowed to use/access the digital miner. Set it to private to restrict other players, public for free access, or trusted for friends. |
| 12 | Redstone Control | Changes the behavior of the digital miner with redstone. Default setting is disabled, allowing for manual control. The digital miner can accept the signal on any of its sides. |
| 13 | Energy Information | Indicates how much energy will be utilized during operation, how much is needed if lacking an insufficient supply of energy and the current unit of energy. Click this tab to change the energy unit used (RF/EU/MJ/J). |
| 14 | Visual Toggle | Click this to see the area that the digital miner will cover when mining. The visuals/field will appear as white cubes so as long as the area is not occupied by any blocks. The white cubes represent the maximum area the digital miner will cover, including blocks at those cubes. |
| 15 | Display Screen | Displays the current status of the digital miner. 'Idle' when not running, 'Running' when operating, 'Not Ready' when machine has not run after being reset, 'Ready' after running at least once, what modes are currently active (On/Off) and how many blocks are left to be mined. |
| 16 | Energy Buffer | Hover the cursor over the bar to see how much energy is currently stored by the digital miner. As it depletes, the green bar will decrease. |
| 17 | Inventory | Mined blocks/items will be stored here. Replacement blocks for the mined blocks can also be placed here instead of using a container with blocks and auto-pull mode active. Once this inventory is full, the digital miner will continue to run but not mine any blocks, so please ensure that this inventory is kept cleared by collecting the items or by using the auto-eject function. |
Filters
ItemStack
Description
This filter allows you to mine/break items (that you can place down) and blocks that you currently have in your possession. Some items (e.g. string) cannot be added to the filter despite being able to be placed in the world. If nothing is being detected (it says 0 below the "To mine:" in the display screen of the main interface) when you start to mine, try turning fuzzy mode on (this will likely be the case for items that can have different orientations, e.g. levers and buttons).
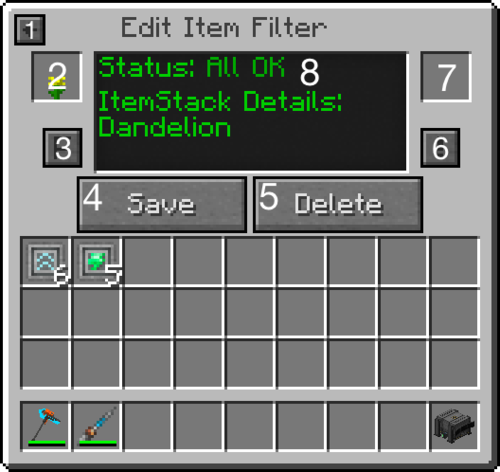
| # | Label | Description |
|---|---|---|
| 1 | Back Arrow | Brings you back to the Create New Filter screen. |
| 2 | Item Slot | Put the item/block you desire to mine/break here. It'll just remember what item you put there, the item/block you used is still available to you. |
| 3 | Fuzzy Mode | Toggles fuzzy mode, in which the filter will also include all metadata values for the id of the item/block. Hover over this to see if fuzzy mode is off or on. |
| 4 | Save Button | Saves your game...no, it'll just add the filter to the miner or save any changes you made to the filter. |
| 5 | Delete Button | Deletes the filter. What more could you want? (Allow redstone maybe?) |
| 6 | Require Replacement Setting | Turn this on to force the miner to only mine so as long as the block/item in the replacement slot is in the digital miner's inventory or in a container on the import port with auto-pull mode activated. It'll inform you what blocks are missing in the block status on the main interface while mining. |
| 7 | Replacement Slot | Put the block item or block you want to be put in place of the item/block you're mining. |
| 8 | Filter Display Screen | Nothing too noteworthy, just make sure what you read is what you wanted to do. |
OreDictionary
Description
This filter allows you to mine ores or blocks by using their ore dictionary names. Depending on what mods you've got, you may be able to see the name by holding shift while hovering over the ore/block you want to mine (can be done in NEI), if not you'll have to use a Dictionary. After entering the name and hitting the checkbox, you'll see the icon of the ore/block in the slot in the ore slot if it worked, otherwise, you'll see a blank slot. This means the name doesn't exist or you didn't spell and/or capitalize the name correctly. It should also be noted that * can be used, when added at the end, it mines everything starting with the given name, e.g. oreC* will mine coal ore (oreCoal), copper ore (oreCopper) and certus quartz ore (oreCertusQuartz and oreChargedCertusQuartz).

| # | Label | Description |
|---|---|---|
| 1 | Back Arrow | Brings you back to the Create New Filter screen. |
| 2 | Ore Slot | The ores/blocks with the matching ore dictionary name entered will appear here, shifting from one to the next. If there is nothing displayed then the name is invalid (unless the ore is invisible). |
| 3 | Ore Dictionary Input Box | Type the ore dictionary name here and click the little checkbox to the right or hit the enter key to input the name. |
| 4 | Save Button | Saves your game...no, it'll just add the filter to the miner or save any changes you made to the filter. |
| 5 | Delete Button | Deletes the filter. What more could you want? (The ability to turn on/off a filter maybe?) |
| 6 | Require Replacement Setting | Turn this on to force the miner to only mine so as long as the block/item in the replacement slot is in the digital miner's inventory or in a container on the import port with auto-pull mode activated. It'll inform you what blocks are missing in the block status on the main interface while mining. |
| 7 | Replacement Slot | Put the block item or block you want to be put in place of the item/block you're mining. |
| 8 | Filter Display Screen | Nothing too noteworthy, you'll see the name (key) that you inputted (if you did). |
Example codes
- To mine Gold Ore:
oreGold - To mine Redstone (redstone ore in Silk Touch mode):
oreRedstone - To mine everything that is made out of wood:
*Wood - To mine Obsidian:
blockObsidian - To mine every ore:
ore* - To mine whatever is made out of Emerald (Emerald block, Emerald ore):
*Emerald
Material
Description
This filter allows you to mine blocks made out of a certain material. The detection is not perfected yet as it may miss some blocks even though it can be crafted by the material specified, other times it will mine similar material even though it's not made out of the material specified, e.g. specify oak wood planks, it will mine spruce stairs. Similar to the ItemStack/Item filter, not all items and blocks will be accepted, even diamonds cannot be specified despite being used in a wide variety of blocks/machines.
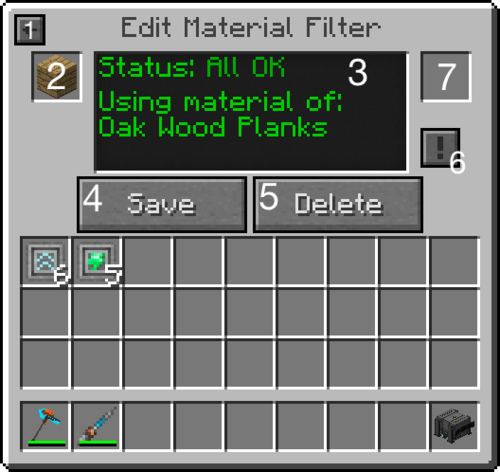
| # | Label | Description |
|---|---|---|
| 1 | Back Arrow | Brings you back to the Create New Filter screen. |
| 2 | Material Slot | Put the material (block/item) you wish to mine/break here. Common materials (like redstone, diamonds, dusts, gears, etc.) cannot be placed here (likely a bug/oversight). |
| 3 | Filter Display Screen | Nothing too noteworthy, you'll see the name of the material you put in (if it was valid). |
| 4 | Save Button | Saves your game...no, it'll just add the filter to the miner or save any changes you made to the filter. |
| 5 | Delete Button | Deletes the filter. What more could you want? (A more functional material filter maybe?) |
| 6 | Require Replacement Setting | Turn this on to force the miner to only mine so as long as the block/item in the replacement slot is in the digital miner's inventory or in a container on the import port with auto-pull mode activated. It'll inform you what blocks are missing in the block status on the main interface while mining. |
| 7 | Replacement Slot | Put the block item or block you want to be put in place of the item/block you're mining. |
Mod ID
Description
This filter allows you to mine blocks/items by mod ID. Although you can find out what the mod ID in game is by pressing F3 + h simultaneously, it doesn't seem as if Mekanism uses these IDs (save for Mekanism core). There seems to be an established list of mods that Mekanism uses, most well-known mods (e.g. Ender IO) should be available to enter. Not all blocks/items will be mined even though the item couldn't be added to ItemStack/Item filter but is in the mod (e.g. entering the ID: Minecraft will still not allow the miner to detect/mine redstone repeaters and comparators). Like with the OreDict filter, * can also be used at the end to set the filter to use any mod IDs beginning what was before the asterisk (e.g. inputting Thermal* will use the IDs: Thermal Foundation and Thermal Expansion. After entering the ID and hitting the checkbox, you'll see various blocks from the specified mod in the mod slot if it worked, otherwise, you'll see a blank slot.
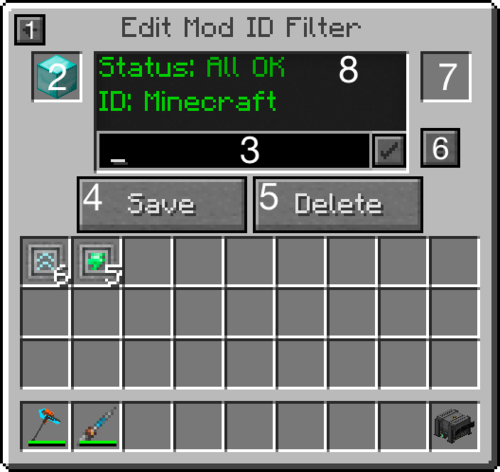
| # | Label | Description |
|---|---|---|
| 1 | Back Arrow | Brings you back to the Create New Filter screen. |
| 2 | Mod Slot | Various blocks from the specified mod will appear here, shifting from one to the next. If there is nothing displayed then the name is invalid. |
| 3 | Mod ID Input Box | Type the mod ID here and click the little checkbox to the right or hit the enter key to input the name. |
| 4 | Save Button | Saves your game...no, it'll just add the filter to the miner or save any changes you made to the filter. |
| 5 | Delete Button | Deletes the filter. What more could you want? (More usable IDs maybe?) |
| 6 | Require Replacement Setting | Turn this on to force the miner to only mine so as long as the block/item in the replacement slot is in the digital miner's inventory or in a container on the import port with auto-pull mode activated. It'll inform you what blocks are missing in the block status on the main interface while mining. |
| 7 | Replacement Slot | Put the block item or block you want to be put in place of the item/block you're mining. |
| 8 | Filter Display Screen | Nothing too noteworthy, you'll see the mod ID (if you inputted one). |
Recognized Mod IDs:
- Applied Energistics 2
- Chisel
- Ender IO
- Minecraft
- Mekanism
- Tinkers* (You cannot type apostrophes in the Input box)
- Thermal Foundation
- Thermal Expansion
- Natura
"AllTheMods9 Digital Miner Not Working (Ores/Etc.)"
Example
Doesn't work where you'd type in ore* as the tag and it would mine all ores in that area but now it's coming up with "no matching targets", It also doesn't seem to be letting me type in caps so I don't know how to search for specific ores.
Forge Ores Usage
You need to open the interface, then config and then add new filter. I always use tag filter, so for example if you want quartz, type in the black field „forge:ores/quartz“. If done right after confirming the filter there should be a new filter in the list with a little preview of nether quartz. If you want any other ore press F3 + H for advanced tooltips and then hover over the ore you want in Jei and press ctrl to see all the tags. I think you then just need to pick a item tag that is unique.